プロジェクト とは、注釈が付けられた1つの動画のことです。注釈には、リンク、画像、ホットスポット、クイズなど、動画の再生中に表示される要素が含まれます。プロジェクトを作成する方法は2つあります:
- 手動の方法 - Interactivity モジュールを使用してプロジェクトを作成します。これが最も一般的な方法です。
- 自動の方法 - インタラクティブ機能が有効な Brightcove プレーヤー内で動画を再生すると、自動的にプロジェクトが作成されます。この方法は通常、テンプレートと組み合わせて使用されます。
プロジェクトを手動で作成する
Interactivity モジュールを使用してプロジェクトを手動で作成できます。以下の手順に従ってプロジェクトを作成してください。
- Video Cloud Studio にログインします。
- Interactivity モジュールを開きます。
- をクリックします。
- プロジェクトタイトル を入力します。
- プロジェクトに使用する動画を選択します。
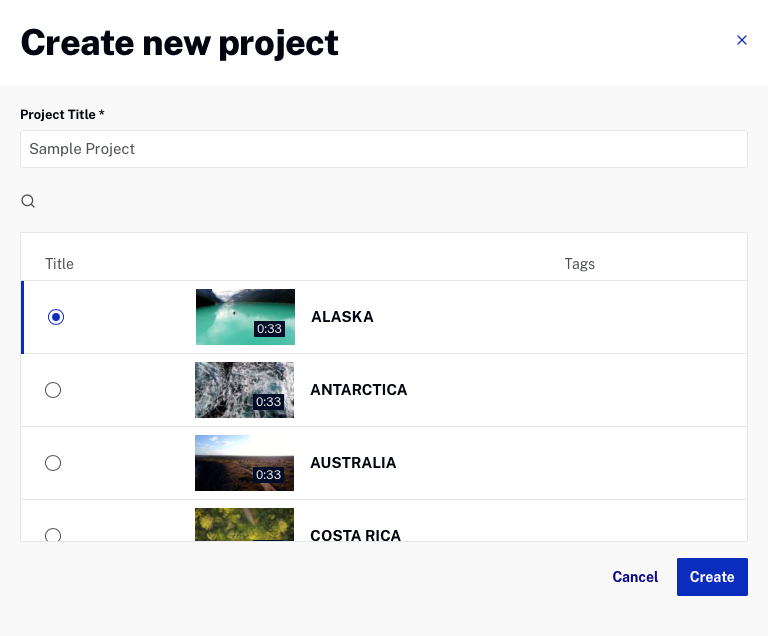
- をクリックします。プロジェクトがプロジェクト一覧に表示されます。
プロジェクトを自動で作成する
インタラクティブ プラグインは、インタラクティブ機能が有効なプレーヤーで再生される Brightcove 動画が自動的にプロジェクトを作成するように、オプション を設定することができます。
インタラクティブ機能が有効な Brightcove プレーヤー内で動画が再生されると、以下のことが起こります:
- Brightcoveの動画ID、タイトル、タグが Brightcove Interactivity に送信されます。
- Brightcove Interactivity が既存のプロジェクト内で動画IDを検索します。
- 一致するレコードが見つからない場合、Brightcove Interactivity が送信されたデータを使用してプロジェクトを作成します。
以下の手順でインタラクティブ プロジェクトを自動作成します。事前にインタラクティブ機能が有効なプレーヤーを準備してください。
- Video Cloud Studio にログインします。
- Media モジュールを開きます。
- 動画のサムネイル横にあるボックスをチェックして、公開する動画を選択します。
- > ウェブに公開をクリックします。
- インタラクティブ プラグインが有効なプレーヤーを選択します。
- プレビューリンクをクリックして、新しいブラウザタブでプレビューを開きます。
- プレビュービデオを再生します(数秒間再生するだけで十分です)。これにより、Brightcove Interactivity にプロジェクトが自動作成されます。
- Interactivity モジュールを開きます。プロジェクト一覧が表示されます。
- 公開した動画がプロジェクト一覧に表示されていることを確認して下さい。

プロジェクトの編集
以下の手順に従ってプロジェクトを編集して下さい。
- Interactivity モジュールを開きます。
- プロジェクトのタイトルをクリックするか、プロジェクトに関連付けられたアクションメニュー(...)をクリックし、閲覧する を選択します。
プロジェクトをフォルダーに移動する
フォルダーを作成してプロジェクトを整理することができます。プロジェクトをフォルダーに移動する前に、フォルダーを作成 しておく必要があります。以下の手順に従ってプロジェクトをフォルダーに移動します。
- Interactivity モジュールを開きます。
- プロジェクトに関連付けられたアクションメニュー(...)をクリックし、フォルダへ移動 を選択します。
フォルダーについての詳細は、フォルダーの操作をご覧ください。
プロジェクトの複製
プロジェクトを複製すると、既存のプロジェクトに似た新しいプロジェクトを作成する際に時間を節約できます。新しい複製プロジェクトの動画ソースを変更し、必要に応じて注釈を調整するだけです。
以下の手順に従ってプロジェクトを複製します。
- Interactivity モジュールを開きます。
- プロジェクトに関連付けられたアクションメニュー(...)をクリックし、複製 を選択します。
- をクリックします。
これにより、すべての注釈、タグ、カスタムCSS を含むプロジェクトの完全なコピーが「{プロジェクト名} - Copy」というタイトルで作成されます。
プロジェクトの削除
プロジェクトを削除するには、プロジェクト一覧からプロジェクトを見つけ、プロジェクトに関連付けられたアクションメニュー(...)をクリックして 削除 を選択します。
プロジェクトをテンプレートに変換する
プロジェクトをテンプレートに変換すると、選択したプロジェクトが プロジェクト セクションから永久に削除され、テンプレートに変わります。この操作は取り消しできません。どのプロジェクトを変換するかを記録しておくか、変換する前にプロジェクトのコピーを作成してください。
以下の手順に従ってプロジェクトをテンプレートに変換します。
- Interactivity モジュールを開きます。
- プロジェクトの タイトル をクリックするか、プロジェクトに関連付けられたアクションメニュー(...)をクリックして 閲覧する を選択します。
- をクリックします。
- をクリックします。
プロジェクトが変換されると、テンプレート セクションに表示されます。
プロジェクト設定の構成
プロジェクト設定を使用して、プロジェクト タイトルの編集、タグの追加、テンプレートの追加、カスタムCSSファイルの割り当て、およびプロジェクトに関連付けられたビデオの差し替えを行うことができます。
以下の手順に従って、プロジェクト設定にアクセスしてください。
- Interactivity モジュールを開きます。
- プロジェクトの タイトル をクリックするか、プロジェクトに関連付けられたアクションメニュー(...)をクリックし、閲覧する をクリックします。
- をクリックします。
詳細については、プロジェクト設定の構成 をご覧ください。
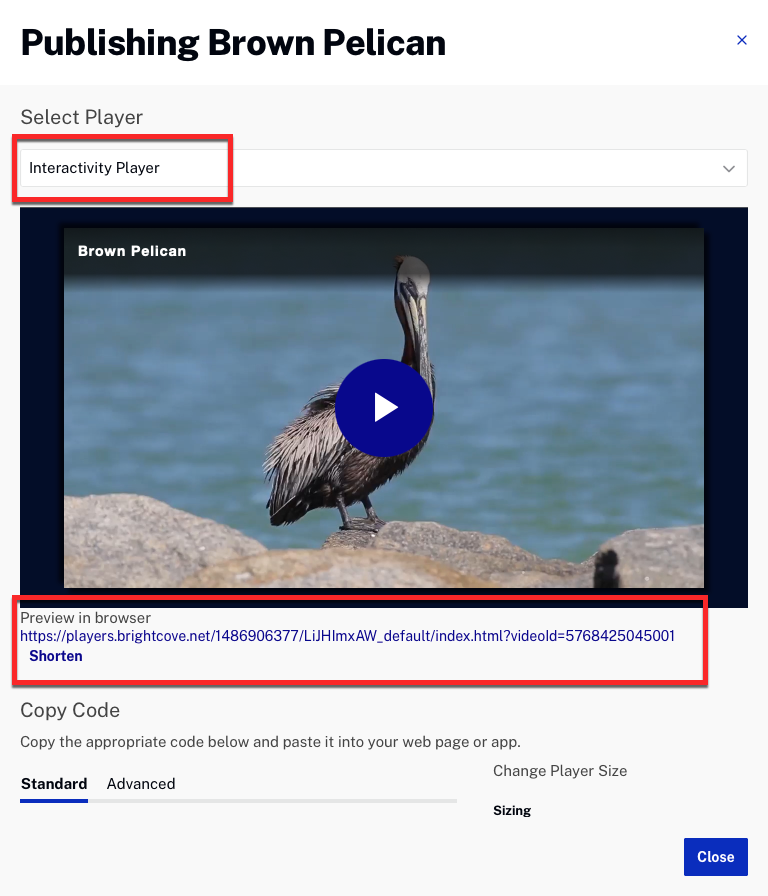
プロジェクトの埋め込み
プロジェクトを埋め込みで、ウェブサイトにプロジェクトを埋め込むための埋め込みコードを生成することができます。
以下の手順に従って、埋め込みコードを生成してください。
- Interactivity モジュールを開きます。
- プロジェクトの タイトル をクリックするか、プロジェクトに関連付けられたアクションメニュー(...)をクリックし、閲覧する をクリックします。
- をクリックします。
詳細については、埋め込みコードの生成 をご覧ください。