概要
この Publish 統合は、Salesforce の Contactオブジェクトを更新します。 Audience Insightsが properties と呼んでいるものは、Salesforceでは、fields と呼ばれています。
Audience Insights の Publish 統合は、値をカスタムフィールドとして Salesforceに送信します。 これらのカスタムフィールドは、まず Salesforceで作成する必要があります。 Salesforceに存在するフィールドのみを設定・更新することができます。これにより、お客様が使用するフィールドのみに限定することができます。
必要要件
- Salesforce のアカウントを持っていること。
- Salesforce ユーザには、オブジェクト マネージャーで Contact オブジェクトを編集する権限を持っていること。
対応フィールド
サブスクライバー エクスポート プロパティ
以下は、サブスクライバー ID を追跡するアカウントで使用できるプロパティです。
|
ラベル |
内部名 |
フィールド タイプ |
|
Days Since Last Video View |
dayssincelastengagement_v1_0_0 |
数字 |
|
Devices Used |
devicesusedlastthreemonths_v1_0_0 |
単一行テキスト |
|
Email Hash (MD5) |
emailhashmd5_v1_0_0 |
単一行テキスト |
|
Email Hash (SHA2) |
emailhashsha2_v1_0_0 |
単一行テキスト |
|
Engagement Status |
engagementStatus_v1_0_0 |
単一行テキスト |
|
Fan of Series |
fanofseries_v1_0_0 |
単一行テキスト |
|
Hours Viewed (Last 3 Months) |
hoursviewedlastthreemonths_v1_0_0 |
数値 |
|
Involuntary Cancellations |
involuntarycancellations_v1_0_0 |
数値 |
|
Is Reconnect |
isreconnect_v1_0_0 |
Single checkbox |
|
Last Video View Date |
lastviewdate_v1_0_0 |
日付ピッカー |
|
Primary Device Used (Last 3 Months) |
primarydevicelastthreemonths_v1_0_0 |
単一行テキスト |
|
Primary Device Used (Lifetime) |
primarydevicelifetime_v1_0_0 |
単一行テキスト |
|
Primary Viewing Location (Last 3 Months) |
primaryviewinglocationlastthreemonths_v1_0_0 |
単一行テキスト |
|
Primary Viewing Location (Lifetime) |
primaryviewinglocationlifetime_v1_0_0 |
単一行テキスト |
|
Series Sampled |
seriessampled_v1_0_0 |
単一行テキスト |
|
Customer ID |
customerid_v1_0_0 |
単一行テキスト |
|
Subscription Channel |
channel_v1_0_0 |
単一行テキスト |
|
Subscription Currency |
unitpricecurrency_v1_0_0 |
単一行テキスト |
|
Subscription End Date |
activeenddate_v1_0_0 |
日付ピッカー |
|
Subscription ID |
subscriptionid_v1_0_0 |
単一行テキスト |
|
Subscriber Lifetime Value |
totalpayments_v1_0_0 |
数値 |
|
Subscription Product |
productname_v1_0_0 |
単一行テキスト |
|
Subscription Special Offer Used |
usedspecialoffer_v1_0_0 |
Single checkbox |
|
Subscription Start Date |
activestartdate_v1_0_0 |
日付ピッカー |
|
Subscription Trial Start Date |
trialstartdate_v1_0_0 |
日付ピッカー |
|
Subscription Unit |
subscriptionunit_v1_0_0 |
単一行テキスト |
|
Subscription Unit Price |
unitprice_v1_0_0 |
数値 |
|
Subscription Tenure (in Days) |
tenure_v1_0_0 |
数値 |
|
Voluntary Cancellations |
voluntarycancellations_v1_0_0 |
数値 |
|
Export Context |
exportcontext_v1_0_0 |
単一行テキスト |
|
Customer Subscription Count |
customersubscriptioncount_v1_0_0 |
数値 |
|
Customer Tenure (in Days) |
customertenure_v1_0_0 |
数値 |
|
Customer Voluntary Cancellation Count |
customervoluntarycancellationcount_v1_0_0 |
数値 |
|
Most Recent Videos |
mostrecentvideos_v1_0_0 |
Single line text |
|
Most Recent Entertaining Videos |
mostrecententertainingvideos_v1_0_0 |
Single line text |
|
First Watched Videos |
firstwatchedvideos_v1_0_0 |
Single line text |
|
Top 3 Genres (Last 3 Months) |
genretop3lastthreemonths_v1_0_0 |
Single line text |
|
Top 3 Genres (Lifetime) |
genretop3lifetime_v1_0_0 |
Single line text |
|
Customer Hours Viewed |
customerhoursviewed_v1_0_0 |
数値 |
|
Entertainment Index (Last 3 Months) |
entertainmentindexlastthreemonths_v1_0_0 |
数値 |
|
Entertainment Index (Lifetime) |
entertainmentindexlifetime_v1_0_0 |
数値 |
|
Segment Ids |
segmentids_v1_0_0 |
Single line text |
|
Segment Names |
segmentnames_v1_0_0 |
Single line text |
登録ユーザー エクスポート プロパティ
以下は、サブスクライバーIDを追跡しない アカウントで使用できるプロパティになります。
|
プロパティ名 |
エクスポート フィールド |
フィールド タイプ |
|
customerid_v1_0_0 |
customerId |
単一行テキスト |
|
rue_firstviewdate_v1_0_0 |
firstViewDate |
日付ピッカー |
|
rue_lastviewdate_v1_0_0 |
lastViewDate |
日付ピッカー |
|
rue_dayssincelastengagement_v1_0_0 |
daysSinceLastEngagement |
数値 |
|
rue_tenure_v1_0_0 |
tenure |
数値 |
|
rue_engagementstatus_v1_0_0 |
engagementStatus |
単一行テキスト |
|
rue_primarydevicelast2years_v1_0_0 |
primaryDeviceLast2Years |
単一行テキスト |
|
rue_primarydevicelast3months_v1_0_0 |
primaryDeviceLast3Months |
単一行テキスト |
|
rue_devicesusedlast3months_v1_0_0 |
devicesUsedLast3Months |
単一行テキスト |
|
rue_primarylocationlast2years_v1_0_0 |
primaryLocationLast2Years |
単一行テキスト |
|
rue_primarylocationlast3months_v1_0_0 |
primaryLocationLast3Months |
単一行テキスト |
|
rue_fanofseries_v1_0_0 |
fanOfSeries |
単一行テキスト |
|
rue_hoursviewedlast3months_v1_0_0 |
hoursViewedLast3Months |
数値 |
|
rue_hoursviewedlast2years_v1_0_0 |
hoursViewedLast2Years |
数値 |
|
rue_mostrecentvideos_v1_0_0 |
mostRecentVideos |
単一行テキスト |
|
rue_mostrecententertainingvideos_v1_0_0 |
mostRecentEntertainingVideos |
単一行テキスト |
|
rue_firstwatchedvideos_v1_0_0 |
firstWatchedVideos |
単一行テキスト |
|
rue_genretop3last3months_v1_0_0 |
genreTop3Last3Months |
単一行テキスト |
|
rue_genretop3last2years_v1_0_0 |
genreTop3Last2Years |
単一行テキスト |
|
rue_entertainmentindexlast3months_v1_0_0 |
entertainmentIndexLast3Months |
数値 |
|
rue_entertainmentindexlast2years_v1_0_0 |
entertainmentIndexLast2Years |
数値 |
|
rue_exportcontext_v1_0_0 |
exportContext |
単一行テキスト |
|
rue_segmentnames_v1_0_0 |
segmentNames |
Large text |
|
rue_segmentids_v1_0_0 |
segmentIds |
Large text |
Salesforceでカスタムフィールドの作成
オブジェクト マネージャー - コンタクト
-
Salesforceのダッシュボードから、右上の 歯車アイコン をクリックし、設定ページに移動します:
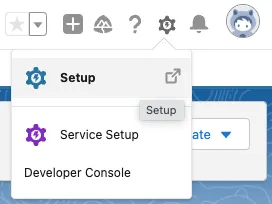
Navigate to Setup セットアップのホームページが表示されます。
-
ページの左側にメニューがあります。Platform Toolsセクションで、Objects and Fieldsを展開し、Object Managerをクリックします:
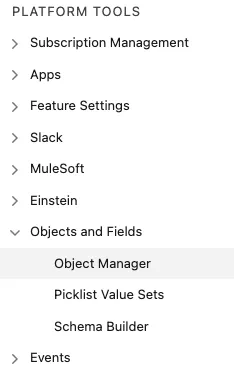
Navigate to Object Manager - アカウントに定義されているオブジェクトのリストが表示されます。 このリストから Contact を選択します。 これにより、Object Manager の Contact ページが表示されます。
-
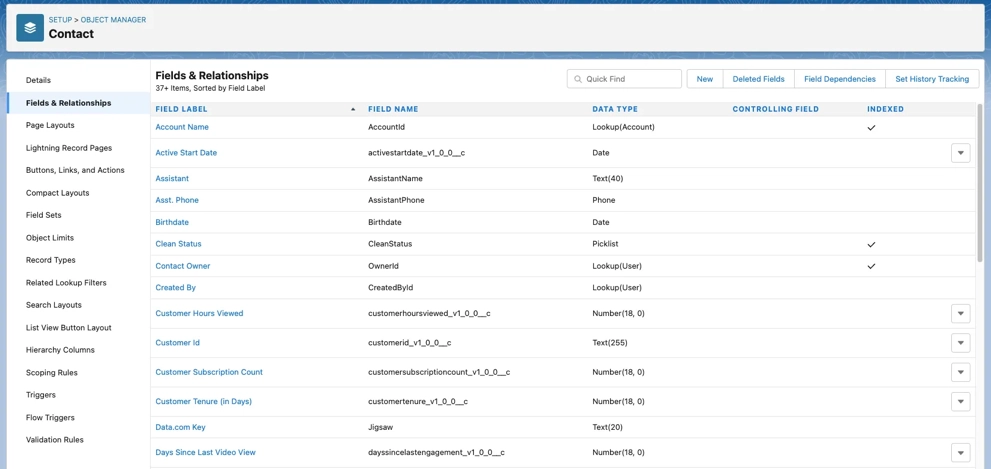
左側のメニューから Fields and Relationships をクリックします:
 タイプは、対応しているフィールドのドキュメントで指定されているものと一致する必要があります。
Navigate to Fields and Relationships - Contact Objectに設定されているフィールドのリストが表示されます。
新規フィールドの追加
- Fields and Relationships ページで、右上の New ボタンをクリックします。 これにより、新しいフィールドを設定するためのウィザードが起動します。(Video Cloud レポートに設定できるフィールドについては、上記の対応フィールド を参照して下さい。)
- この例では、“Subscription Product” フィールドを設定します。
-
フィールドのデータ型を選択します:
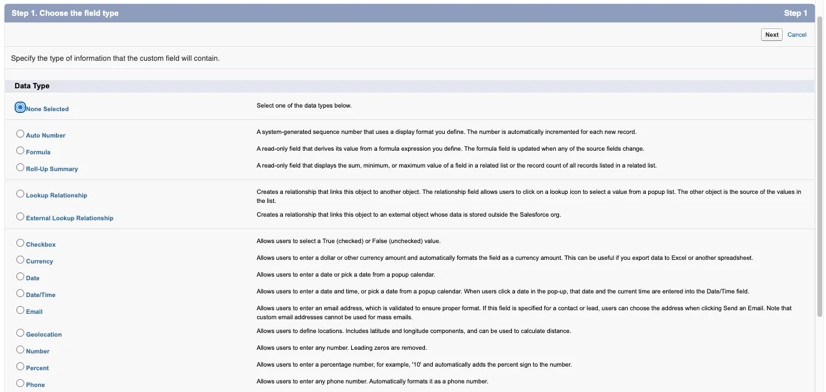
Select Data Type 注: タイプは、対応しているフィールドの表で指定されているものと一致している必要があります。
- Subscription Product の例では、データ型は、“単一行のテキスト”になります。テキスト オプションを選択し、Nextボタンをクリックします。
-
フィールドの詳細を入力します:
- フィールドのラベルと名前、オプションで説明を入力します。
- ラベルはユーザーが望む有用なラベルであれば何でも良いですが、その名前は対応しているフィールドの表の内部名と完全一致していなければなりません。一致しない場合は更新されません。
- Subscription Product の例では、名前は “productname_v1_0_0” となります。
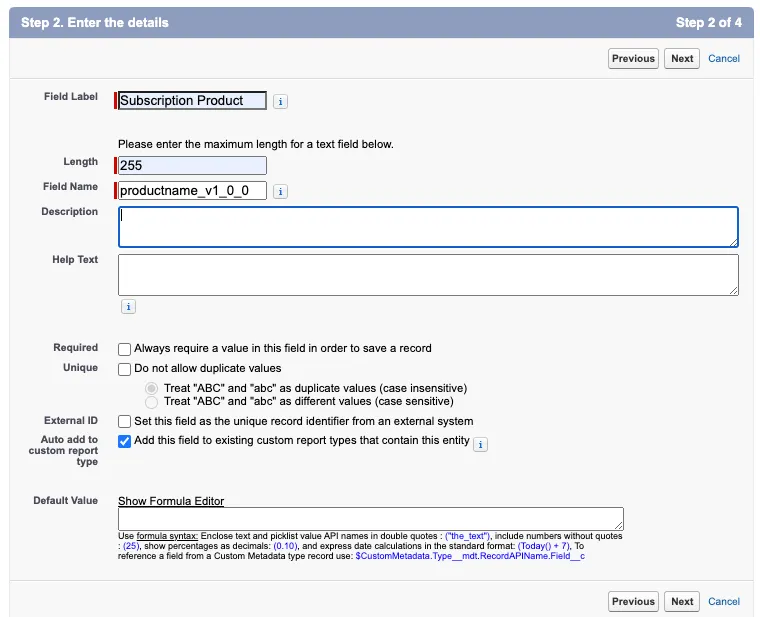
Field Details -
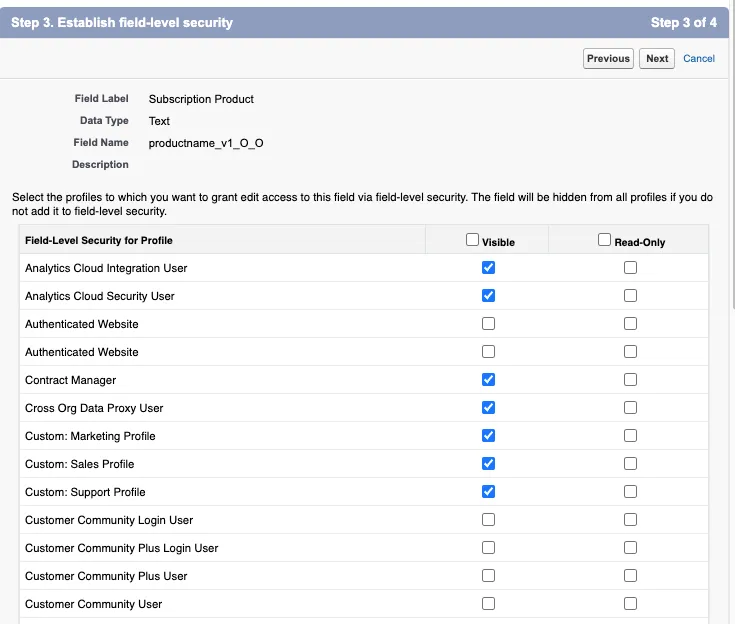
フィールド レベルのセキュリティの確立 - このフィールドに適切なアクセスレベルを設定します。これはユーザの要件によって異なるかもしれませんが、推奨はほとんどの場所で見えるようにすることです:
Access Control - ページ レイアウトに追加 - フィールドを表示する場所を設定します。
- Save をクリックしてフィールドの追加を完了します。
-
新しいフィールドが Fields and Relationships ページに表示されるはずです:

Sample Field Created フィールド名には自動的に
__cというサフィックスが付加されていることに注意してください。 これは Salesforceがカスタムフィールドを示す方法であり、これは予想された動作です。