以下の手順は参照用に残しています。
エクスペリエンスは、ビデオ プレーヤーと動的に対話する、ビデオ プレーヤーの外部にある他の要素 (同期されたスライドや e コマース カートなど) を含むビデオです。エクスペリエンスを使用すると、ビデオと Web ページ自体の間で動的に通信できるようになり、視聴者に新世代のインタラクティブな現実への扉が開かれます。
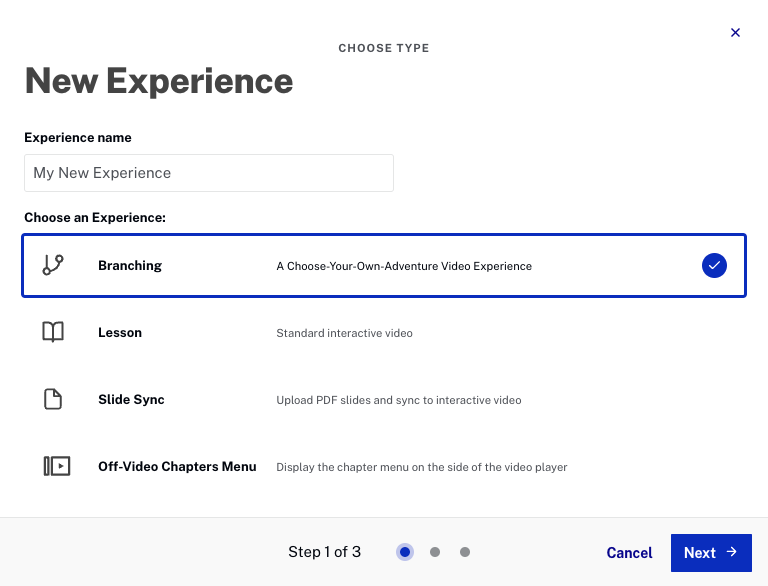
新しいエクスペリエンスの作成
以下の手順に従って新しいエクスペリエンスを作成します。
- Video Cloud Studio にログインします。
- Interactivity モジュールを開きます。
- 左側のナビゲーションで エクスペリエンス > すべてのエクスペリエンス をクリックします。
- をクリックします。
- エクスペリエンスの名前 を入力します。
- エクスペリエンスの種類を選択します。
- をクリックします。
- エクスペリエンスに追加する1つ以上のプロジェクトを選択します。
- をクリックします。
- エクスペリエンス設定を確認し、をクリックします。
さまざまな種類のエクスペリエンスを作成する方法については、関連トピックをご覧ください:
エクスペリエンスの編集
以下の手順に従ってエクスペリエンスを編集します。
- Interactivity モジュールを開きます。
- 左側のナビゲーションで エクスペリエンス > すべてのエクスペリエンス をクリックします。
- エクスペリエンスの タイトル をクリックするか、関連するアクションメニュー(...)をクリックし、閲覧する をクリックします。
エクスペリエンス設定の構成
エクスペリエンス設定では、エクスペリエンスのタイトルやタグの変更、エクスペリエンスの動作を制御することができます。利用可能な設定はエクスペリエンスの種類によって異なります。
以下の手順でエクスペリエンス設定を構成してください。
- Interactivity モジュールを開きます。
- 左側のナビゲーションで、エクスペリエンス > すべてのエクスペリエンス をクリックします。
- エクスペリエンスの タイトル をクリックするか、テンプレートに関連付けられたアクションメニュー(...)をクリックして 閲覧する を選択します。
- をクリックします。
- 必要に応じて設定を編集します。完了したら をクリックします。
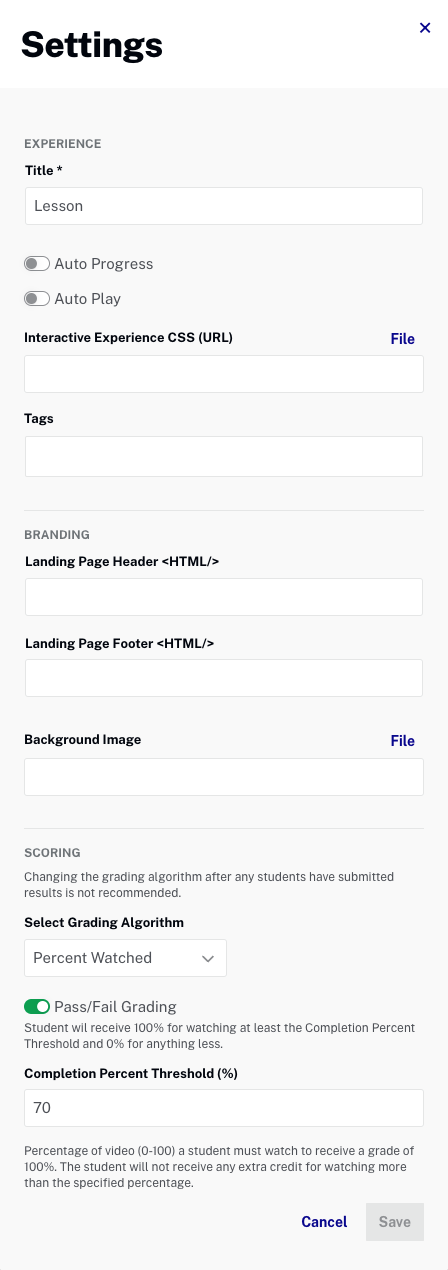
エクスペリエンス設定
エクスペリエンス設定はすべてのエクスペリエンス タイプで利用可能です。
- タイトル - エクスペリエンスのタイトル
- 自動処理 - 前のプロジェクトが終了するとプレイリスト内の次のビデオを再生
- 自動再生 - ランディングページの読み込み時に自動再生
- インタラクティブ エクスペリエンス CSS(URL) - エクスペリエンスのスタイル設定に使用するカスタムCSSファイルのURL
- タグ - エクスペリエンスのタグ(検索を容易にするためのタグ)
- デフォルト ズーム - エクスペリエンスのデフォルト ズームレベルを設定(スライド同期のみ)
ブランディング設定
ブランディング設定は分岐、スライド同期、レッスンで利用可能です。
エクスペリエンスは、プロジェクトをウェブページに埋め込むか、ランディングページを共有することで視聴者に提供できます。ランディングページは、視聴者が固定URLでアクセスできる単一ページです。ブランディング設定を使用してランディングページの外観をスタイル設定することができます。
- ランディング ページヘッダーHTML - ランディング ページのヘッダーに表示されるHTML
- ランディング ページフッターHTML - ランディングページのフッターに表示されるHTML
- 背景画像 - ランディングページの背景画像
採点設定
採点アルゴリズムを選択設定はレッスンでのみ利用可能です。
- 採点アルゴリズムを選択
- クイズ結果 - スコアは正解数を全質問数で割った値。
- 視聴済みまでゲート制御 - 視聴が 完了率の閾値 を超えた場合、スコアは100%となり、視聴者は閾値に達するまで提出できません。
- 視聴割合 - 合格/不合格の採点方式を使用。
- 合否判定 - 有効にすると、学生は完了率の閾値以上視聴した場合100%、それ以下の場合は0%となります。
- 完了パーセントのしきい値(%) - 学生が100%のスコアを得るために視聴する必要のある動画の割合(0-100)。
プロジェクトの追加
以下の手順でエクスペリエンスにプロジェクトを追加してください。
- 左側のナビゲーションで、エクスペリエンス > すべてのエクスペリエンス をクリックします。
- テンプレートの タイトル をクリックするか、エクスペリエンスに関連付けられたアクションメニュー(...)をクリックして 閲覧する を選択します。
- をクリックします。
- 追加するプロジェクトを選択します。
- をクリックします。
再生順序の変更
エクスペリエンス内のプロジェクトの再生順序を変更するには、以下の手順に従ってください。
- 左側のナビゲーションで、エクスペリエンス > すべてのエクスペリエンス をクリックします。
- テンプレートの タイトル をクリックするか、対象のエクスペリエンスに関連するアクションメニュー(...)をクリックして閲覧する を選択します。
- をクリックします。
- プロジェクトをクリックし、再生順序の新しい位置にドラッグします。
- をクリックします。
エクスペリエンスをフォルダーに移動する
フォルダーを作成し、エクスペリエンスを整理するために使用できます。エクスペリエンスをフォルダーに移動する前に、フォルダーを作成する必要があります。以下の手順でエクスペリエンスをフォルダーに移動します。
- Interactivity モジュールを開きます。
- 左側のナビゲーションで、エクスペリエンス > すべてのエクスペリエンス をクリックします。
- 対象のエクスペリエンスに関連するアクションメニュー(...)をクリックして フォルダへ移動 を選択します。
フォルダーに関する詳細は、フォルダーの操作 を参照してください。
エクスペリエンスの複製
エクスペリエンスを複製することで、類似した新しいエクスペリエンスを作成する際の時間を節約することができます。必要に応じてプロジェクトを追加/削除し、エクスペリエンス設定を編集してください。
以下の手順でエクスペリエンスを複製します。
- Interactivity モジュールを開きます。
- 左側のナビゲーションで、エクスペリエンス > すべてのエクスペリエンス をクリックします。
- 対象のエクスペリエンスに関連するアクションメニュー(...)をクリックして 複製 を選択します。
- をクリックします。
これにより、すべてのプロジェクト、タグ、カスタムCSSを含むエクスペリエンスの完全なクローンが「{エクスペリエンス名} - Copy」というタイトルで作成されます。
エクスペリエンスの削除
エクスペリエンスを削除するには、エクスペリエンスリストで対象のエクスペリエンスを見つけ、関連するアクションメニュー(...)をクリックして 削除 を選択します。