Custom Form (カスタムフォーム) ウィジェットを使用すると、Googleフォーム、Mailchimp、Typeform、Calendly、Eventbriteなど、任意のシステムからフォームをビデオ上に埋め込むことができます。また、カスタムフォーム ウィジェットは外部ウェブコンテンツを表示するためにも使用できます。以下の例では、行動喚起テキストをクリックするとビデオ上にフォームが表示されます。
はじめる前に
プレーヤーにインタラクティブ機能を追加する前に、インタラクティブ機能が有効な Brightcove プレーヤーが必要であり、インタラクティブ プロジェクトが作成されている必要があります。詳細については、インタラクティブの概要を参照してください。
カスタムフォームウィジェットを追加する
カスタムフォーム ウィジェットは、ビデオ再生中にフォームを表示するために使用できます。再生中に行動喚起テキストが表示され、それをクリックするとフォームがスライドインして表示されます。外部フォーム(例: Googleフォーム)を使用することで、送信されたデータが直接そのシステムに送信される利点があります。フォームに送信されたデータは Brightcoveのインタラクティブレポートには表示されず、直接外部システムにルートされます。
以下の手順で、カスタムフォーム(このトピックでは Googleフォームを使用)ウィジェットをプロジェクトに追加します:
- Video Cloud Studio にログインします。
- Interactivity モジュールを開きます。
- プロジェクトの タイトル をクリックして開きます。
- 下部ツールバーでウィジェット アイコンをクリックします。
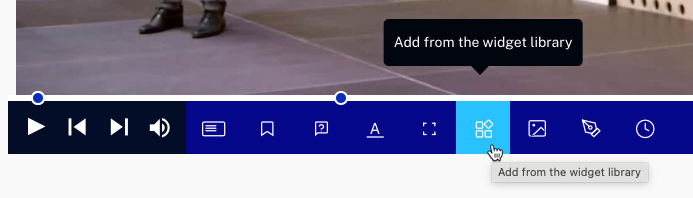
- Custom Form (カスタムフォーム) ウィジェットをクリックします。
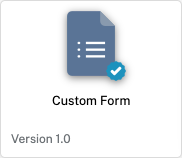
- ADDをクリックします。ウィジェットがプロジェクトビデオの上に追加されます。
- ウィジェットをクリックしてドラッグし、ビデオ上でテキストを表示したい位置に配置します。
- メニュー内の Done (完了)リンクをクリックします。

- Your Text Here テキストの上にカーソルを合わせてCONFIGURE (設定)をクリックします。
- FORM SOURCE (フォーム ソース)フィールドにフォームのURLを貼り付けます。URLが公開されていることを確認してください。
- Button Text (ボタン テキスト)を更新します。これは視聴者がフォームを開くためにクリックする行動喚起テキストです。
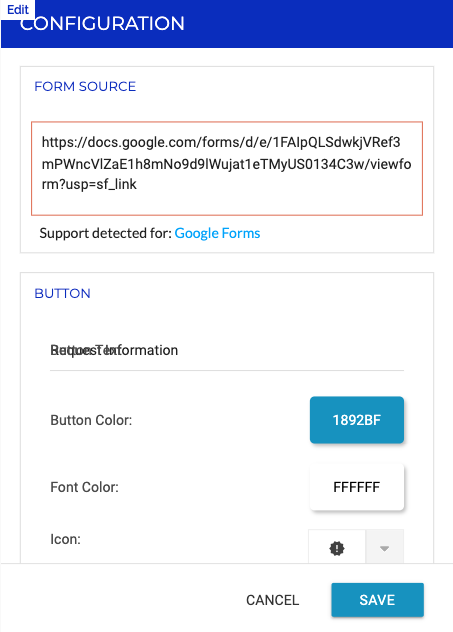
- SAVE (保存)をクリックします。
- Edit (編集)をクリックしてエディタを開きます。
- Start Time (開始時間)メニューをクリックします。
- 秒数、割合、または時間形式で Start Time を入力します。 をクリックします。
- オーバーレイの期間を設定するために時計アイコンをクリックします。 (送信)をクリックします。
- Done (完了)をクリックします。
ビデオのプレビューリンクを取得し、行動喚起テキストとフォームが表示されることを確認してください。
ウェブページを表示する
カスタムフォーム ウィジェットを使用して、別のウェブページのコンテンツを表示することもできます。手順はフォームを追加する場合と同じですが、URLには表示したいページのURLを指定します。この例では、行動喚起のテキストがクリックされると、Wikipediaのページが表示されます。
「今すぐ購入」ページを表示する
カスタムフォーム ウィジェットを使用して、「今すぐ購入」タイプのショッピングページを表示することもできます。この例では、行動喚起のテキストがクリックされると、ショッピングページが表示されます。
ヒント
- Googleフォームのような外部フォームをこの注釈と組み合わせて使用する場合、送信されたデータはすべてそのシステムに直接送信されるという利点があります。フォームに送信されたデータは、Brightcove Interactivity の標準レポートには表示されず、外部システムに直接ルーティングされることに注意してください。
- 開始時間を5秒または10秒(動画の冒頭付近)に設定し、終了時間を Until the end of the video (動画の終了まで)に設定することを検討してください。これにより、視聴者は動画の任意の時点でCTAをクリックでき、CTAをクリックするまでフォームを非表示にしておくことができます。